My arms were far to achy for any climbing so we headed down to Heysham instead. The tide was just going out, the wind barely noticeable and it was quite warm. Not quite the total washout that was predicted. We had a look around the corner ontowards Morecambe with the graveyard and the ruined chapel on the cliff but made a uturn and headed to our usual spot.
My first thought was to make a long pebble line of faded colours so I began searching for the contrasting colours I would use as a guide, but the idea didn't grab me so I gave up on that one. I had finally brought down all the split pebbles collected from Lytham so I thought it was time for another attempt for a spiral. I sat up on one of the sandstone slabs and bashed the final unsplit pebbles until I had quite a large collection of them. I selected a piece of sand on which to start building and transported a few of the pebbles down onto the beach (why I didn't unload them all down their in the first place I don't know)! After placing three of the split pebbles a few sppits and spots of rain came down. I stuffed my waterproofs under a slab in anticipation of making a rain shadow. The rain suddenly increased in heaviness so I dashed over to the slab, there was no time to put on my waterproofs and laid down. I had to keep my mouth and eyes shut to keep the water out and I was desperate to know whether the rain shadow was appearing and for there to be a break in the rain so I could go and get my camera. Julia brought it over and said that she didn't think the rain shadow was working. It was raining very heavily now and I was soaked through to the skin and quite cold. I got up to examine the slab and indeed she was right, it looked just as wet underneath me as it did either side! Hmmm it seems that a light shower would be much better and the slab needs to be flat, Julia's idea of the lying on the sand wouldv'e been much better, the rain had created an interesting texture on the sand's surface.
After the soaking I went back to the sculpture. I didn't think it would be quite to make as it was. The wet sand now stuck to everything requiring much blowing and sweeping and the lining up of the crack around the spiral took hours and hours. Each time I would move one part another part would move out of alignment. Selection of pebbles was important, ones with a vertical split down the middle worked best and balancing them over each others edges worked well too. The finishing touches took ages too, standing over and squinting at the crack to ensure it flowed and there weren't too many kinks in it, it might have appeared like I have OCD as I fiddled with the smallest little detail but it is all important for the final image. Just wish I had spent the time scratching the pebbles white!
Monday, May 14, 2007
Another Goldsworthy Spiral
Monday, May 07, 2007
Balls and Slabs Balance

We needed to get out of the house for a bit as we were going a bit stir crazy, Julia felt a bit ill and I felt tired and listless. My first few balances just didn't seem to work and I felt particularly uninspired so I thought I would try at another slanting balance. Decent slabs were few and far between and it took some time to find enough. This time I really wanted to concentrate on getting the structure looking symmetrical and balanced. It suffered a collapse half way through so I begun again but there was no way to prevent it from being precarious and carefully balanced, the breeze wasn't helping. But then they don't have to stand up for very long when you can freeze it in time by taking a photo. I think it turned out especially well and is my best of this design to date.
Stick Crack

I looked round for another slab that framed the mud covered stick better. This one fitted almost exactly with no altering of the stick required and if I stood right over it parts of it reached the edge. I didn't see it when I was there but in the resultant phot it almost looks like a crack in the rock, not intentional but quite interesting.
Half Black Stick

I had seen this stick in Brik Bank Quarry on Saturday when we were climbing there. MY first thought was to cover it in green leaves so that it contrasted with the gritstone slab at the base of the climbs. But after experimenting with that at home I decided the leaves were now not young enough to give a strong enough green. So I used more of the peat to cover the stick. The earth was easier to work when it was really wet and it didn't take too long to cover it. I liked the contrast when it was half covered so I took pictures of both half covered and fully covered. I tried to get it in exactly the same place on the slab but didn't quite succeed and the shape of the stick wasn't quite right as it didn't fill the frame well enough.
Peat Cracks

After finishing the rock stacks I wandered into the woods trying to think of something else to do. Underneath the leaf litter where I had removed a slab the earth was very dark, if not black. I dug some up and then used it to fill in the cracks on this boulder. I am not sure whether the affect works or not. Andy Goldsworthy obviously puts a lot of effort into selecting a suitable boulder where the effect will be maximised.
Arch Stack

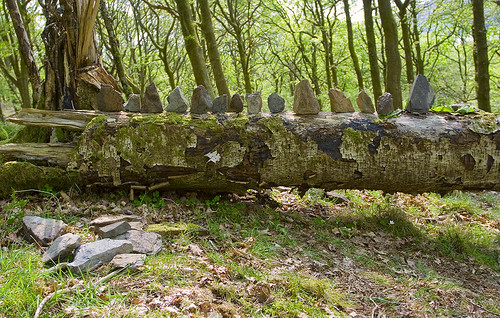
I was imagining a stack where in the middle there would be a circle, an upside dowb arch with a another arch on top but this changed to making an ordinary arch. I needed two rocks with sloping edges to hold the arch. The first one came easily but it took ages to find a second one. But once I had done I liberated flat slabs from the earlier stack, found some more and constrcuted the arch. It took 3 attempts to hold them altogether and slot them into place. I didn't use anything underneath to hold them, I just slotted them straight in the shuffled them around a little to make the arch more pronounced. It worked quite well. I was in a quandry as to what to do next. My first idea was to place a large curved branch through the middle to create a wooden arch and then build slabs around the ends to give the affect that the wood was growing out of the stone. I searched for a suitable branch but nothing was quite right so instead I continued the stack. The rest of the stack was quite precarious and one of the big slabs on the end fell over and I can't believe the arch survived. The connecting stone in the middle was only just standing up and each stone added on top made the arch creak a little more each time. Wisely I thought I had better get a photo at this point as I thought it was coming down soon. I wanted to put a large pinnacle on top and as I was doing so it did fall down so I am glad I got this picture before I tried that.
Slanting Stack
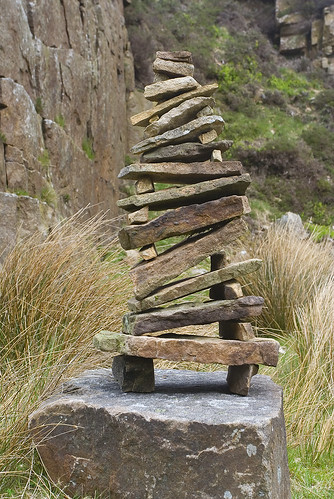
Following on from the other slanting stack I wanted to do one which slanted one for multiple layers then the other way. It took quite a while to find enough flat slabs and some of them were very heavy and required lugging out of the nearby wood. Most of these got discarded as the were too big and made it look out of balance. So I settled on the smaller slabs and positioning them three one way then three the other and so on. The effect gets a bit lost near to the top. I managed to fire off three shots before it fell down! It was another windy day.
Sunday, April 29, 2007
Sandstone Fragments Sculpture

This was the piece I started off doing when we arrived at Heysham beach but didn't complete until we were going home. I wanted to try smashing a piece of sandstone and reassemble with a hole in the middle but I couldn't get them to break how I wanted. So I thought about trying this crazy paving style sculpture and I pleased with how it ended up. I had to wait to finish it late because of the three bickering geology students hogging the cliff and I managed to get it done before the annoying family who started a bonfire turned up! The beach is definitely better on rainy, cold days!

Volcano

A bit of an unsuccesful attempt at a round sand castle of different colours. Didn't turn how I wanted it at all. Shame 'cos the red stone to make the top to ages to grind! There must be some mileage in the dry sand, wet sand grey/black sand contrast but I found it difficult to work with. Uniform colours look much better but are very hard to do.
Remade from the Purple Cairn
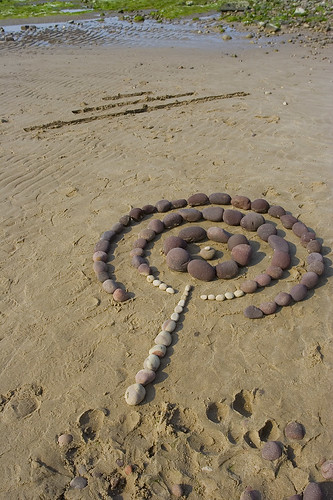
This is what I made from the remains of the purple cairn. It might look simple but it took loads of fiddling about to get the balance of it right - moving stones around, discarding others and redoing it again and again. Worked out pretty well in the end and the trenches I'd dug much earlier framed it nicely in the photo.
Remains of the Purple Cairn
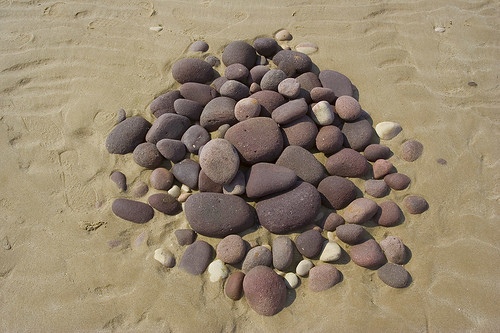
I was interested to see whether or not the purple cairn I made at Heysham Head last week would still be there when we returned. The tide was high and just starting to go out as we arrived but as we traversed the cliffs at the top I could see this pile of purple rocks where the cairn had been. What remained I think it actually looked quite pleasing!
Saturday, April 28, 2007
Wood Antlers
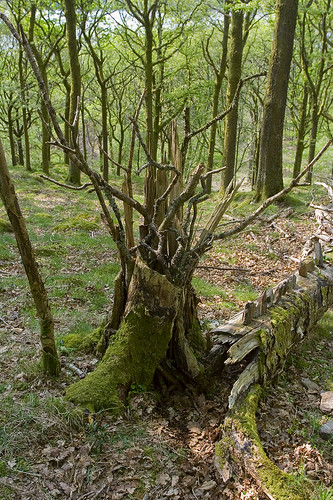
Lots of wood lying about, decide to make an arrangement in a natural wooden vase, a hollow tree stump.
A lot of the leaves were not fully out on the trees, it sort of enhanced the woodiness of it all.
Bracken Struts
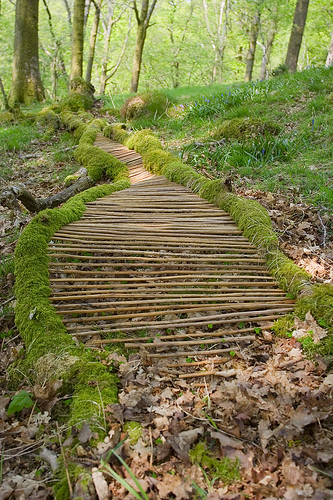
There were some great root systems and dead branches in the forest next to Coniston water and my eye was caught by this dead branch covered in moss. There was quite a lot of dead bracken nearby and that seemed perfect for this design. Shame about the ticks in the undergrowth! Anyway this didn't take too long to do and I think it worked out pretty well.
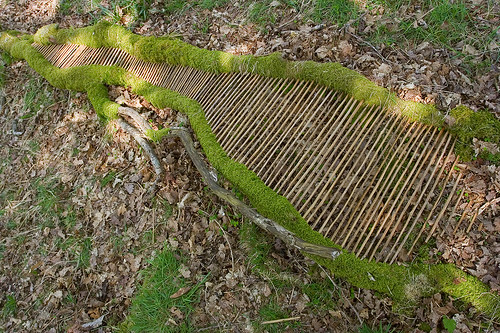
Moss & Bark Hole
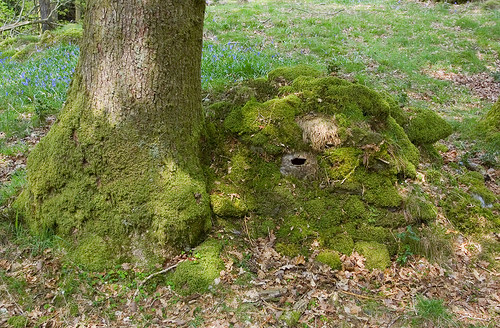
I found a fantastic bit of bark about 12 inches square and desperately wanted to do something with it. It had a hole in the middle so I has in mind a goldsworthy type hole. I found this stone cairn with moss growing all over it and thought it would be perfect to put the bark in to create and eye or a hole. I then got some moss and covered over the bark to try and disguise it and put moss covered rocks along the bottom to finish it off.
Thursday, April 26, 2007
Leaf Horn

My first attempt at pinning leaves with thorns. I want to be able to build a spiral in this style so this was an experiment to see how it is done. It is actually reasonably difficult and you need good long thorns and need to be careful how you score and fold the leaves. A good hard bit of flat ground underneath is necessary too as the thorns don't stay in otherwise.
Monday, April 23, 2007
Purple Cairn

Back to Heysham Head again today. Some of my previous day's scuplture was still there - the sticks had gone but the frame, although partly buried, remained. I had decided to build a cairn of fading colours and decreasing sized pebbles. It took a surprising amount of effort and also nearly took the longest time of anything I have made. To find enough of the same colour and size for each layer took ages, but was good exercise! I noticed that there were some rocks with a split colour between red/pink purple and yellow/white so I intended to fade from deep purple at the bottom to red and pink then use the split pebbles to fade into white. This took a lot of fiddling about, disassembling, reassembling, selection of different rocks and the discarding of many. I also worked hard on the shape of it to get it to look well formed and symmetrical. Once I had the split colour pebbles in place I then worked on the forming the top. This was even more difficult as the little pebbles just kept falling off again and again. More working on the shape and finally it was finished. I was 75% happy with it. It looked good from only one angle and didn't look right in the others. The split colour pebbles just didn't look quite right and in hindsight a straight demarcation between purple and white would have looked better, or indeed different coloured rocks with more colour changes. Unfortunately the most photogenic angle had the power station behind and the best angle was low down so it looms behind in the finished photo. It was a dull day so the colours do not come out well in the photo, I am quite disappointed with the result. The cairn did look good from a distance though and the fade looked quite striking. Next time I might try two or three cairns of the same colour. Maybe purple, a red one and pink one. I will definitely try another design again.
Sunday, April 22, 2007
Centre of the Circle
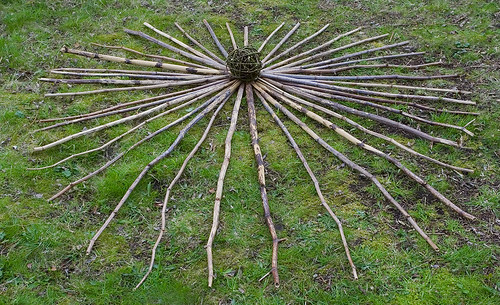
Done quickly out in the wood behind the flat when I was bored. It was quite large - probably 10 foot across - finished with one of my stick balls in the middle.
Saturday, April 21, 2007
Slanting balance

I wanted to start building balances that have a more aesthetic look more like Andy Goldsworthy's creations. After I had finished the tree in a frame I had a little time to give it a go. There are nice flat blocks at Heysham and nice round gritstone pebbles too. This one went up reasonably easily with onluy a couple of disconcerting wobbles. The green white brown contrast behind was not planned but works well in the picture. I need to pay more attention to where things go to get the best picture. I did build it higher later on but I don't think it looked as good.

Tree in a frame
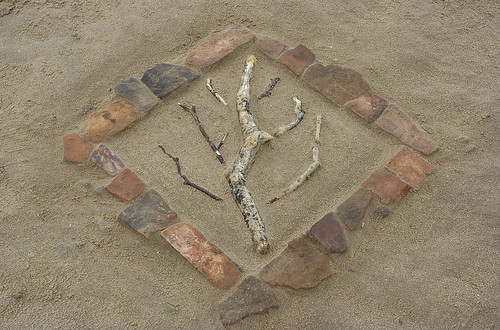
I dashed down to Heysham Head and Half Moon Bay first thing wanting to build a frame that I would make a pebble sculture in the middle of. I knew that there was a fresh rockfall on the cliffs next to where we were last week and that meant that there would be plenty of square edged rock that had not been weathered by the sea. I found that the rock was actually gritstone which I found surprising as it is normally found on the moors and it varied in colour from black, red to silvery grey. I collected as many blocks as I could carry and ferried them to the beach many times. I assembled the frame away from where I was going to build it to try and get an order for the blocks. Once I was happy with the order I moved them to a nice section of sand and started to dig them in. It took a couple of hours to get the balance of the frame right, I collected more and more blocks and discarded many to get the right shape and feel. Many early versions lacked symmetry, form and balance. I started to become aware that the tide was coming in so I needed to crack on. Whilst I was looking for blocks I noticed a nice piece of driftwood that would fit perfectly. I looked for the split pebbles to arrange them in the frame as that was my first intention but I hadn't brought them with me. So I decided on a tree design. Yet more fiddling with the design of the frame followed until I was finally happy and dug them all in. I filled in the outside and then slighlty buried them and swept off the excess sand. I thought that this worked quite well as the sand filled in all the gaps around the blocks. Then I spent a lot more time smoothing out the surface with one eye on the tide. Now I needed to suitable sticks to form the branches and this meant several more trips up to the cliffs until I was happy. I dug them all in a little and smoothed out the sand. By accident there are dark twigs on the left and light ones on the right but looking at the picture now the top two are reversed. How annoying! Then I did lots of sweeping and pernickety sand cearing to finish of it. I am very pleased with the result.

Thursday, April 19, 2007
Stick Stack

My first attempt at a stick cairn and I am very pleased with how it had turned out. Oncve I got the base sorted out with a nice circular curve I then just had to builf and build with smaller sticks keeping the curves as much as I could. There are a few places where I could have done it better but I have learnt a lot making this one that I will definitely make an improved one next time. This is in the little wood out the back of the flat and took a few hours to make after work.