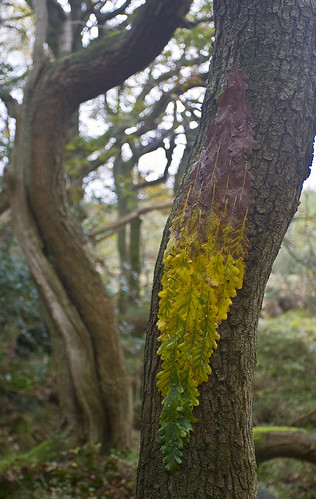
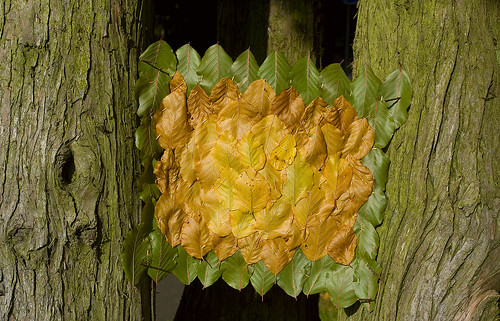
I noticed the oak leaves when I was going back down to the car after my run last Thursday on Clougha. The leaves had three colours - green, brown and yellow - many of them with those three colours present on the one leaf. I imagined making a leaf patch on the ground that wouls be a patchwork where the colours would join so there were pools of colour, not fading but each colour linking up with teh same colour on another leaf.
Today I collected some and noticed how the stalks on some were a different colour to the rest of the leaf, some brown ones had yellow stalks, some yellow ones had brown. This was the same with the veins. Some yellow ones had green veins and so on. I like the shape of oak leaves - they remind me of jigsaw puzzle pieces.
Whilst making the leaf fade on the tree branch I noticed the tree as it was framed by another two which would lend itself to containing a stick frame to go around a work. First I fiddled around making a frame wondering what to put inside it. First I thought of a line of sycamore leaves I had left over but then I settled on the oak leaves.
I really liked the mottled brown leaves with the yellow stems so I thought I would make the sculpture fade around this feature. The shape of the tree leant itself to this sort of design so I followed what seemed to go best.
I kept running out of thorns so I had to cannabilise them from the other work and to get the shape I wanted I kept having to peer at it from where I would take the picture. I am glad I did as the shape needed a lot of tweaking but I think in the end it is nicely balanced. I tried not to compromise (even though I was knackered and wanted to go home) but I perservered and collected the right leaves until I got the fade just how I wanted it. This also involved chopping the tops off the yellow ones in the centre as they had too much brown on them and it confused the look. I am pretty pleased with it however. I think it has turned out well.
Saturday, October 27, 2007
Oak Patch
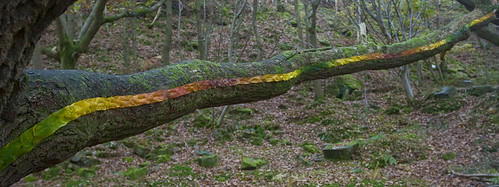
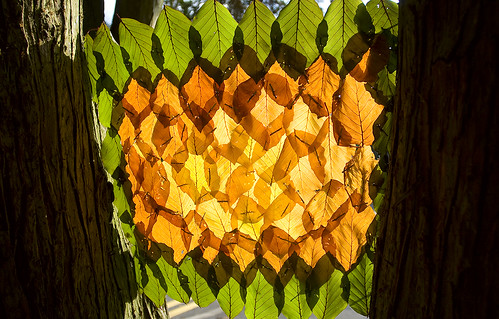
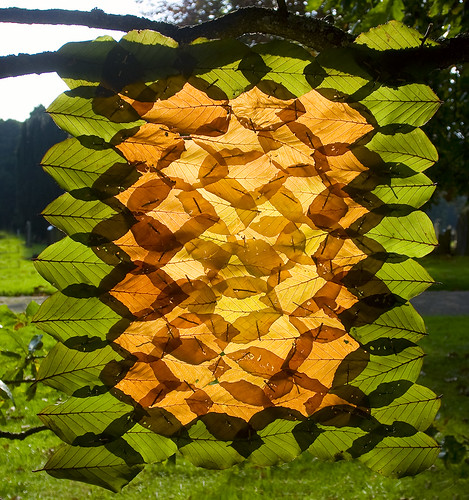
Autumn Leaf Fade
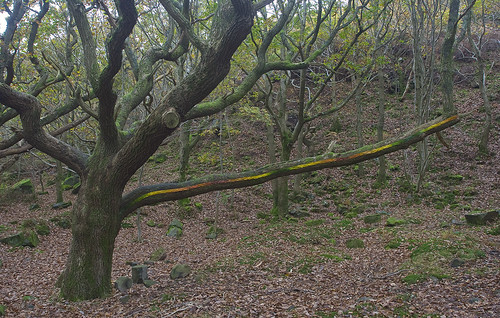
The autumn colours are turnign out to be really good this year. Apparently the exceptionally wet summer has meant the leaves are full of sugars which means more vibrant colours.
This tree is near to where I run on Clougha Pike and I have had my eye on its straight branch for a while. Earlier this week I experimented with a torn leaf line on a tree near to the flat but didn't finish it. I have been trying to pick the good places to make sculptures now as the resultant image is much improved if the situation is good. I collected some sycamore leaves and then drove over to Birk Bank.
The design is pretty straightforward with the centre section of each leaf cut out and pinned to the tree with thorns. Occasionally I had to reverse the direction of the leaf to keep the fade going the right way as it went from one colour to the next. The colours aren't the same all the way along as I tried to follow the fade of each leaf so at the strat there is less yelloe, more orange and dark red, whereas in the middle there is some brown and then more plae yellows. Doing this certainly gives you a deep feel for the multitude of colours that are present.
The picture is disappointing though. Maybe next time I will take a series of pictures and stitch them together.
Sunday, October 21, 2007
Leaf Square
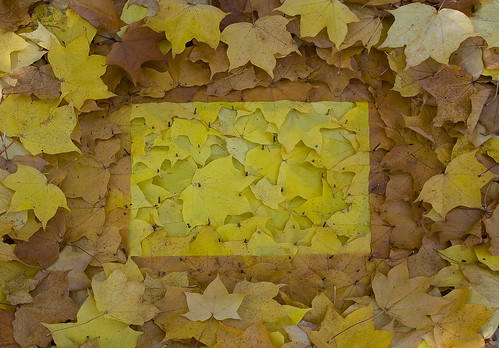
Down the bottom of the cemetery there is a group of sycamores with quite striking leaves. The autumn leaf litter underneath them consists of hues from yellow through to brown. Each leaf seems to be only of one colour though and the shades are quite subtle, almost pastel. I love those leaves and thoughts of how to use them in a work buzzed around my head for a few weeks. I didn’t think it would be possible to make anything under those trees, even though I would have liked to, as there were too many graves and it just wasn’t private and I really didn’t want to upset anyone. Shame really as I much prefer to make the work at the location from where the materials are collected.
In the morning I collected a bag full of leaves with the intention of taking them down to the woods by the Crook ‘o’ Lune and making something there. In my mind I imagined making a square of yellow leaves surrounded by brown leaves where the join between the two would be created by tearing along the middle of a brown leaf that is same shape as the yellow one to create the effect that the colour change is within a single leaf. I liked the idea of a square because I thought it might look like a window, a view, if you like, into another world. I wanted to achieve that otherworldly feel so inherent in Goldsworthy’s work.
I had looked at AG’s circular leaf works and I didn’t want to copy them exactly, another reason to try a different shape, but I couldn’t quite imagine how this would work in the corners. I thought that that might mess up the whole look but I persevered nonetheless.
First I pinned yellow leaves into the centre with thorns after clearing a patch of earth in the forest. I then attempted to start to create an edge. What at first seemed quite simple appeared to be problematic. Finding two leaves one brown, one yellow of the same size seemed to take ages. This is going to take a long time I think! But I persevered and this process became easier as I started to tune into the size and shapes of the leaves.
The first corner did prove a problem. It had to overlap it in a way that meant the continuous yellow/brown leaf effect was destroyed. But I don’t think it is too obvious in the final picture. Perhaps next time I will create a corner in the brown leaf on top rather than tearing it right through, maybe that will work.
Soon I ran out of thorns and had to go off to collect some more, none of the trees nearby were any good but I found some in the field next door. I grabbed some whole dead branches and carried them back to the leaf patch.
The right size and shape leaves were coming more easily to hand now and it didn’t take long to finish off the square. Now I need to complete the brown frame. Lots more pinning down required. At first I tried to make the leaves look like they had fallen there naturally but this didn’t really look right so I altered the orientation of the leaves to make them point outwards around the frame. This looked more balanced.
I set the camera up and looked at it through the viewfinder and took some test shots. This immediately showed me that one of the leaves in the frame was too light and stuck out like a sore thumb so I changed it.
I created a shadow with my body and the cushion I had been sitting on so that the light across the work was uniform and took some shots. Like this it looked a bit too artificial and wasn’t quite creating the effect that I desired. My original idea was to create a leaf patch that was hidden amongst the leaf litter so that it looked like it was part of the natural landscape yet alien to it as well.
I used some of the left over leaves to surround the square and make it look like it was amongst the leaf litter. Now this was more like it! This was just what I was trying to achieve! I became quite excited about the work, it seemed to come alive. The photo probably does not do it justice but the affect in person was quite stunning.
Probably my best work to date. I couldn’t wait to get home and load up the pictures!

Saturday, October 20, 2007
Leaf Spiral

Since I started to look for sweet chestnut trees I have found quite a few. There are three in the cemetery, one of which is very small and consequently produces larger leaves, and ones of good quality. Also we chanced upon one in the park that had dropped some remarkably large leaves. I collected a bag full with the plan of making a spiral this time. It seems that it would benefit from being pinned with thorns more thoroughly so that it would retain its structure better, so I collected lots of long thorns too.
The practice of making the first two horns meant that starting off the spiral was straightforward and I quickly made progress. I joined each leaf to the next with grass stalks and pinned the leaves together with thorns trying to make the structure spiral round as quickly and as sharply as possible. As the leaves spiralled around I just laid each leaf on top of the next without constricting the previous one so that the hollow tube was getting larger and larger far too quickly to my eye, as after I had completed 360 degrees the tube seemed to be very wide and a couple of leaves were required to make one revolution. This would mean that it would take a lot of leaves and a long time to make a decent number of turns in the spiral.
So the next day after work I carried on with the construction by firstly unravelling 50% of what I had already done and reassembling it so that each leaf was tighter to the previous one so the width would increase more slowly. This meant that the spiral was longer and thinner but the leaves had dried out somewhat and were more crispy meaning that the holes made by the thorns would be too big and unsightly.
As the spiral grew it became more unwieldy and difficult to work with. It was important to keep the structure tight so that the spiral continued around itself with no gaps, which meant I had to pay close attention to how I was building each segment. Not as easy as one might first think it would be.
The next day I got home from work and found that it had fallen off the top shelf of the bookcase and was a bit squashed. Again the last section of the spiral had become too large so I again unravelled it so that I could tighten the coils more. This seemed to be easier after making it once – i.e. to construct the turns too large, then deconstruct it and make the turns tighter. In hindsight this was a mistake and I wished that I hadn’t unravelled it. It is much easier to make each new leaf how you want it and to pin it in the right place. It is much less easy to handle many coils and pin them just where you want. This resulted in it becoming misshapen and lumpy and the dried out leaves became too brittle and the coils kept coming undone and I created far too many holes with the thorns.
Next time I will try and build it all in one go, from scratch, making sure that I was happy with each coil before I moved onto the next and make efforts to ensure that it doesn’t expand too quickly. Patience and attention to detail being key and I will also try and achieve that organic shape and quality where each segment is laid at the same angle as the next so it looks like a naturally formed crustacean.
On Saturday the sun was shining so I took the spiral out to look for somewhere to photograph it. I got a very strange look from a passing teenager who looked very curious as to what I was carrying, I don’t supposed he had ever seen anything like it. I headed for the chestnut tree by the entrance to Standen Park, perhaps I would place in on the fallen leaves for a photo. I tried this but it didn’t quite look right. What I was really after was a branch to sit it on and just above there was a perfect hollow on a branch to sit it on and the late afternoon autumn sunshine dappled across it was just what I was looking for. I like the comment I got on Flickr “a cocoon left by a giant but benevolent creature”! Quite amusing really, but I was trying to achieve that organic strangeness inherent in Andy Goldsworthy’s work. Of course this is a copy but efforts made in the setting and lighting for a photograph of a work really pays dividends. I am coming to appreciate more and more AG’s skill with the materials, setting, with light and with the photograph to achieve much more than the sum of their parts.

Saturday, October 13, 2007
Second Leaf Box
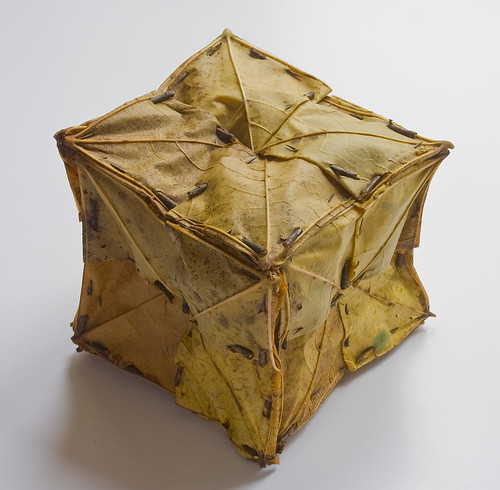
With all I had learnt from constructing the first leaf box I decided, the next day, to make another one.
This time I realised it was important to only use leaves that had a solid right angle in the veins and not to use leaves that didn't. I had used leaves that weren't fully 90 degrees in the first box and it had skewed the shape quite considerably.
Whilst hunting for suitable leaves in the cemetery I discovered that certain trees had many leaves that were right angled or a little more whereas others had none, all were less that 90 degrees. I found the right trees last and I was getting little worried that I wouldn't find any suitable ones as I examined leaves from several trees before I found some good ones.
Eventually I had found enough and collected a load of thorns and began. I concentrated on ensuring the shpae was as good as I could get it and that the sides were of even lengths. As I came to finish it one of the side joins had split but I found thos useful as I could get my fingers inside to place the last few thorns and one finished the gap was held closed and was invisible.
I am really pleased with the final result and the box has a real tactile quality, the leaves feel soft and box has a kind of spring. I guess it will dry out over time and go much browner and drier.
I had a lot of difficulty getting a decent picture of the first box. I couldn't find anywhere outside to take a decent picture and with the stems stuill attached to the leaves it just wouldn't sit properly anywhere. So with this box I decided to take a picture indoors using natural light and a reflector to help the contrast. I tried in on a black background but white seemed to be better.
I am making quite a collection on leafworks now - two horns and two boxes to go with the stick balls.
Friday, October 12, 2007
First Leaf Box

I studied how Goldsworthy had made his leaf box and discovered that the sycamore leaves have right angled veins on them. This was the secret to amkeing the leaf boxes cubic shape.
I gathered a pile of leaves and began to construct the first square that wouldl make the base. I used dried grass stalks to pin it together but this didn't seem to work so well so I wenty to collect some thorns. These worked much better as the sharp point allowed me to pin the leaves together much more successfully.
As I neared the end of the box any inconsitencies in shape became immediately apparent and exaggerated as the form had to be pulled together. It seemed it was important to construct the box carefully right from the beginning.
Not really happy with the final result but a useful exercise in discovering how to construct a box and what I must do now to make a better one.
Sunday, October 07, 2007
Fading autumn leaves
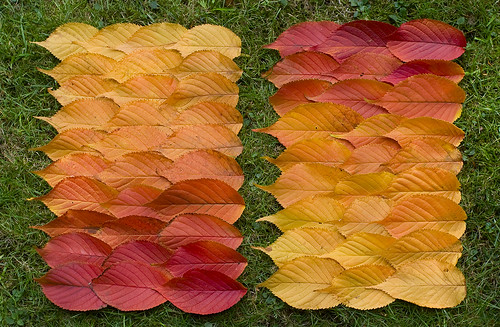
We went for a walk to look at all the trees around the area again, first to the leisure park, then to the park. The park was full of screaming kids and miserable looking parents so we headed for the cemetry for some solitude. A foghorn of woman walked past several times yakking, very loudly, on her mobile phone. So much for solitude but it was still better than the park. I was devoid of inspiration, I wanted to do something with the yellow and green lime leaves but it just wasn't working. The cherry tree colours were just too hard to ignore so I started to make something with them.
Most of the leaves had turned now and they were dropping off the tree with every gust of wind. The orange, pink and red hues were just wonderful though. And it didn't take too long to create one square, although I rebuilt it several times - being careful to keep the spines straight. It just didn't look like enough on it's own so I decided to copy it but make the colours reverse. First I tried a frame but that didn't work so I settled on making another the same size. An 8bit Jpeg though just doesn't do the colours justice.
Saturday, October 06, 2007
Leaf Curtain
The beech tree at the end of the road had three distint colours - yellow, orange/brown and green and I had been considering what to make with them for a while. An idea about placing them in a split stick and staking them into the ground and some other ideas but today the sign is out so I must make something where I can photograph the sun shining through it.
Using dried grass stalks I pinned together a frame of green leaves then filled in the frame with brown, orange then finally yellow leaves. Next time I will try and build it from the inside out as it became quite difficult to pin the last few leaves in middle. Quite a few of the leaves tore and needed repinning but it made it easier to pin them under a vein. Now finished I needed to find a place to pin it up so the sun would shine through it. This proved to be quite difficult!
We went to the cemetry to harvest some thorns to pin it up with, while I carried it around carefully in a folded up sheet, but horizontal branches or frames to pin it to proved elusive. We walked around 90% of the park before finding somewhere right next to the three cherry trees with wonderfully coloured leaves.
The light breeze was a real pain and I had to wait for ages while it stopped and the curtain hung undisturbed. Something was missing though and another yellow leaf needed pinning to the middle. I went searching for a yellow beech leaf and found one nearby, although the tree seemed to be a different beech variety.
Once I had pictures in the can (or on the card) there we went back to where the work was originally made and ironically, there was now a frame in a tree that I could pin it to. It didn't turn out as neat as I wanted but it did look quite good with the sun shining through it. I was surprised to still see it there pinned to the tree on Sunday but by Monday it had gone.
Friday, October 05, 2007
Leaf horn in leaves

I studied just how Andy Goldsworthy makes his leaf horns and discovered some tricks. It is a continuous spiral with each leaf pinned to the next, with the thickest leaf spine being joined to the thinnest of the next so each leaf is reversed in orientation to the previous one. We also went lookign for sweet chestnut trees and found a nice one by the Lune whuch had produced some nice supple leaves which has made this horm look a lot neater. I think Andy uses a lot more bits of grass to pin his horns so that they are quite fixed in shape whereas mine concertinered in and out quite a lot so took quite a bit of positioning to get to sit straight. I really wanted to get the tail to sit right over the top but it just wouldn't stay there. So the next one I make I will pin a bit more thoroughly. It defintely pays to try and keep the divisions the same size as it looks neater and I have discovered that a certain type of dried grass is best as it is thinner and hence sharper and penetrates the leaf better. Also the leaves dry out quite quickly and it is better to make the horn the same day as you collect the leaves.
This picture was taken in bright sunshine in horse chestnut leaves which produce a rich colured background. The grass gave better contrast but I struggled to get the horn to look shapely enough. Several lessons learnt but I am very pleased with the result.

Wednesday, October 03, 2007
Leaf Horn

My first attempt at making a Goldsworthy leaf horn. I wanted to make more but ran out of leaves and the ones I did have were not very good quality. I hope the results will be better with better leaves.
I had to study the Rivers and Tides DVD to see how Andy puts together his creations, and after first trying to pin together rings of leaves in concentric circles I saw that AG's method of spiralling round each leaf whilst inserting the next leaf within the last one and pinning it to it, then continuing the spiral was a much more successful method.
We will try and find a stash of sweet chestnut leaves so that I can make something much larger. Dried grass stalks definitely worked very well for the pins too.
There is something very tactile about these constuctions. The crispness of the leaves and organic shape make me want to pick it up and examine it.