I was undecided whether to make anything today. I fancied spending all day playing on my Playstation but that really wouldn't be a good way to finish off an excellent year.
The strong cold winds of yesterday had abated so I headed off again to Ribblesdale to play in the snow.
It had snowed some more and there was new powder on top of the frozen crust and the mountains looked so very beautiful.
This time I took a direct route to where I was going to set up. This seemed like a sensible plan until I sunk one leg up to my knee in a stream, hidden by the snow, only for the cold water to find it's way down the top of my boot. Fortunately I had on my ice climbing boots and they are nice and warm
Rabbits were skipping about on top of the fresh snow and I was surprised to see a jet black one looking like a rabbit shaped hole cut out in the snow. They soon scarpered as I approached.
I had no idea what I was going to make so I set about checking out the condition of the snow to see whether that would spark any ideas. I opened my rucksack and realised I hadn't brought a jacket with me and I was going to get cold. Ever resourceful I pulled out my bothy bag (like a tarp) and my fold up seat. I stuffed the latter down the front of my trousers so that it felt like a bullet proof vest and I wrapped the former around my shoulders before zipping my top over them both. Ray Mears/Bear Grylls/Bush Tucker man/Chuck Norris (delete as applicable) would be proud of me! Then I set about making something.
Engrossed as I was in what I was doing I didn't notice the two gentleman approaching me until they were right upon me. I get a bit precious about freshly fallen snow and don't want anybody to take it's virginity. These two guys walked straight towards me leaving a trail in the fresh powder and I muttered to myself about how they were soiling my snow. That's right MY snow! The first of the pair got closer and I said:-
"Hello"
"Hello" he said back.
"What the 'eck are you doing?" He enquired. You see, Ribblesdale is in Yorkshire.
"I'm making a snow sculpture."
"Different" he replied.
My partner uses the word 'different' to describe food I have cooked for her that she doesn't particularly like.
The second guy came up behind the first and send to his mate "what is he doing?"
"Making a snow sculpture."
"Doing what?"
"Making a snow sculpture" he repeated.
"Oh, a snow culture I see." No I don't know what snow culture is either, something to do with skiing perhaps?
"Have a good day" they both chimed together and were on their way.
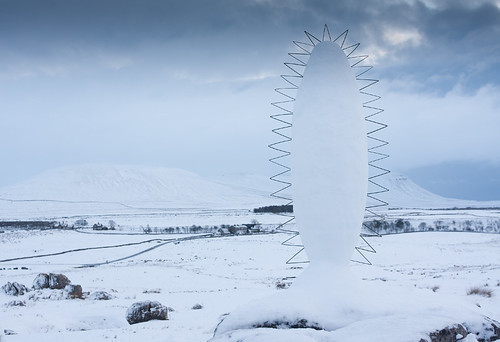
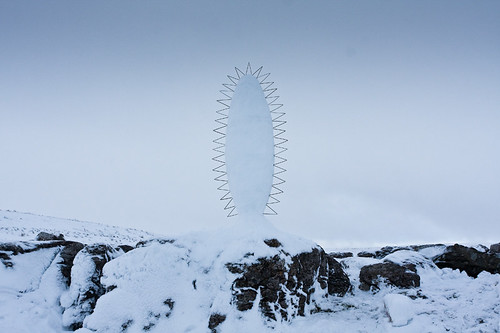
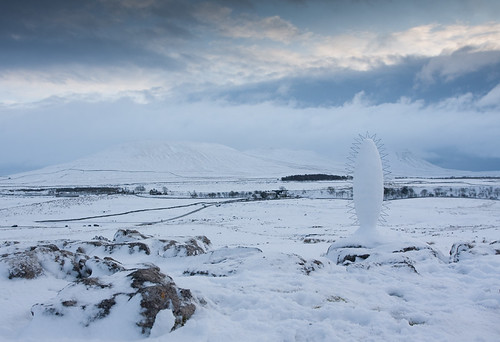
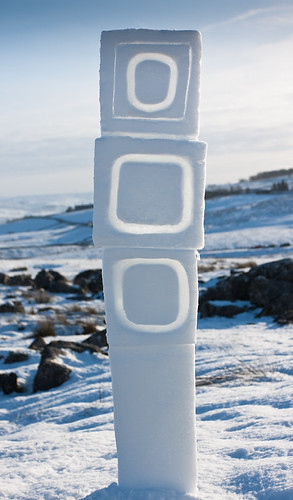
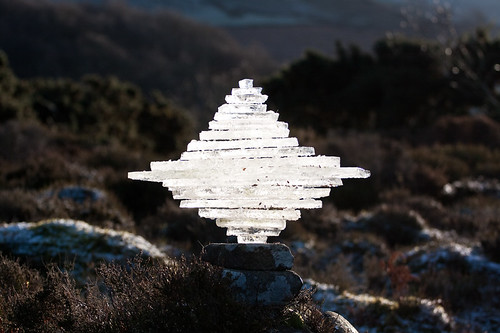
After trying a few different things I decided to start on what you can see here. Sentinel seemed an apt name but magnet would be another. As it seemed to be drawing people in my direction.
A family group were obviously intrigued as to what I was doing and I could see them gawping at me from where they were sledging. After a while they climbed up the slope to see what I was making. I won't bore you with all the conversation but here are some edited highlights.
The dad got to me first and stood proud on a rock like a mountain goat who had found the highest vantage point. He bellowed to his two sons "go left there boys."
"Why?" They shouted back.
"Because there is a big hole in front of you." This was like a red rag to a bull and they went straight towards it, just to have a look.
"DON'T!!" their dad shouted at quite some decibels. At this point a nearly knocked the sculpture off it's perch as I jumped out of my skin. It is so peaceful out in the wilds.
As one of the lads got closer, he must have been about 8, he asked me how long I had been making it. "Three or four hours, something like that" I told him.
"Not long then" he replied as he trudged off in the snow. Well, seeing as I was wearing rubber gloves with no insualtion and my fingers were frozen, three hours seemed like plenty thank you!
Then the mum asked me what I was going to call it. I said "I haven't thought of anything yet but it does look a bit like a kebab?" (see below for the snow donner in it's early stages).
Off they all trudged, the magnet had done it's work and now I was left to get on with it again.
When it was at about 3/4 height (it was about 5 foot tall) I started to sculpt it into the shape I wanted as I didn't want to add more weight as I feared it would fall over. Gently I carved the shape and rubbed powder into it to smooth out it's surface. As I collected powder from round and about the boulders I dumped it by it's base and smeared on handfuls just like applying wet clay to a clay sculpture.
I stood on the boulder it was built on ready to attack the top section, all of sudden my foot slipped and my weight went into the sculpture, cracking it around the base. I put my arms around it to keep it upright, swore under my breath, and panicking tried to think what I could do to save it.
The trouble was that it was the base I needed to shore up and I was standing up holding the top. I inched my way down slowly and tipped it towards me whilst pressing snow into the crack. Phew, it steadied and stayed upright. How close was that!
Once I had finished I stood back to look at it and realised that it blended into the background and would disappear in a photo. It was then that I thought about adding the grass stalks.
Just as I was finishing the last of those I admired how the sky looked very beautiful in front of me. I turned round to be confronted by a wall of white as a snow storm hit me full in the face. Within seconds it was a complete whiteout but I did discover that my camera keeps on working despite having three inches of snow caked to it's back.
I waited for the snow to clear and the dramatic skies returned and the sentinel stood proud over the valley.
Now I'll bet that you think that this Land Art lark is all over once I have the photo in the can. Well you'd be wrong! I always make a day of it whether I finish the sculpture early or not so seeing as I am on a (verbal diarrhoea) roll and you know all about how I make each sculpture well now I am going to tell you what else I do!
So photo in the can, stuff packed up and back to the car. Defrost car, change out of boots and drive home.
Get home (partner at work), switch on computer and start to download photos. Start putting dinner on, change out of wet clothes, begin writing my story, have shower. Get out of shower, stir dinner, write a bit more story. Look at photographs, put on some clothes, write some more story, go out to pick my partner from work. Get home, make tea, put some rice on, write some more of the story, stir the chilli, dish up and eat. Finish eating, make some coffee, finish off the story, process photos for Flickr, load up to Flickr, tag, assign to sets and groups, put on my blog and breathe... All in the space of two hours, time to sit down and have a beer I reckon! I am always telling you how Land Art has many hidden layers but I bet you didn't know how many!
That's funny, all I can hear now is snoring!
A happy new year to you all!
Thursday, December 31, 2009
Ribblesdale Snow Sentinel
Monday, December 28, 2009
Ribblesdale Stacked Snow Squares
It feels like quite a while since I got out and did some Land Art. We've had a fair dump of snow in the last week or so and I've only managed a few abortive attempts at making some sculptures with it. The weather forecasts spoke of a thaw come Boxing Day and I have been itching to get out. But what with working up to Christmas Eve and Christmas Day to be spent with relatives I felt that I might be out of luck.
As we drove into Yorkshire on Christmas Day our senses were regaled with stunning azure blue skies, a foot or so of snow and a hard frost that left the trees white all over. Quite stunning but I had left my camera at home and I wouldn't be able to get out in it at all. So while I awaited Christmas dinner I was Mr. Grumpy.
Boxing Day did bring a thaw and only bits and pieces of ice and snow at home remained. Mr Grumpy decided to stay.
This morning the sky was clear and the temperatures low so I headed once again into Yorkshire looking for snow.
I wasn't disappointed.
As I drove inland the temperature dropped and dropped and everything became whiter and whiter. As I arrived in Ribblesdale I was rewarded with a winter wonderland.
But the powder of the days before, stuff that sticks together and could be sculpted, was gone and the snow had turned to sugar and would not stick.
But the setting was still beautiful so I set about making something from grass. As I was collecting some more stalks I suddenly sunk up to my knees in a deeper spot and underneath the frozen, sugary crust was fine powder and it stuck together as I squeezed it. I tried to chop out a section and it came out in one piece. Now this stuff would be perfect for sculpting!
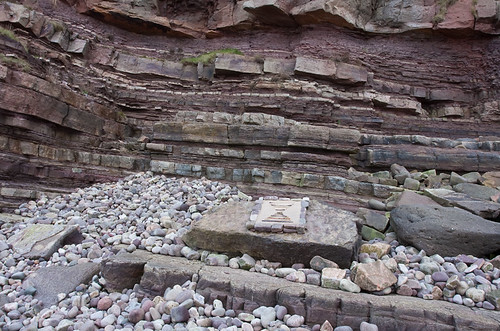
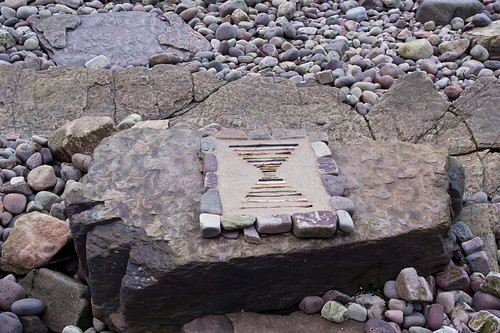
As an experiment I made this first sculpture to learn about the properties of the snow and what I would need to know to make something more involved. Where the snow was compacted powder it was a dream to carve and lent itself to sharp, smooth edges. But in places it was still sugary and icey and this demanded a great deal more care to carve.
I really like Barbara Hepworth's sculptures and her work was the inspiration for this. It is made up of four sections each carefully balanced on the one below it and then carved to let the light show through.
As I finished up a rescue helicopter hovered over the summit of Ingleborough and a hot air balloon was being inflated next to the road. Trains passed over the viaduct quite often and I expect tourists on the Settle to Carlisle route were treated to spectacular views. Snow, blue skies and a bank holiday meant many, many people were out to enjoy the sun and the Winter wonderland.

Square Snow Sun Window
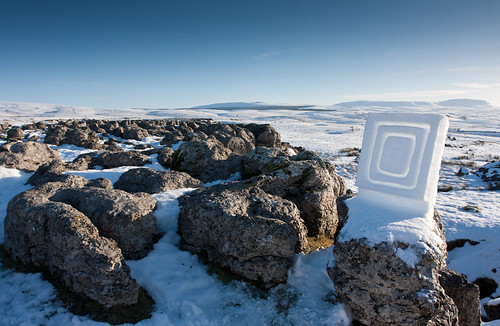
This was the first snow sculpture I made when I arrived at this spot. I used what I learnt making this one, the texture and quality of the snow to improve the result of the three tier sculpture.
Snow Scrapers
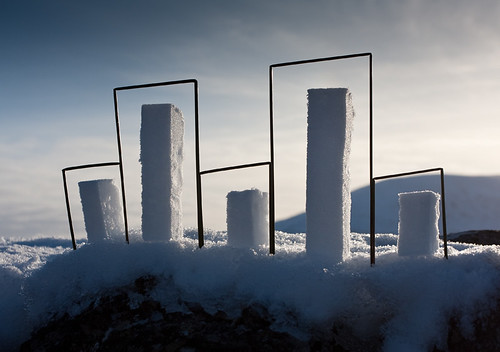
I made the grass sculpture when I first arrived as I didn't think the snow was any good. I took another look at it when I finished the snow sculptures and thought I would add some snow towers to finish it off.
Saturday, December 19, 2009
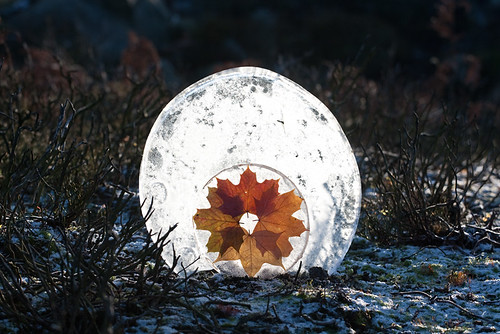
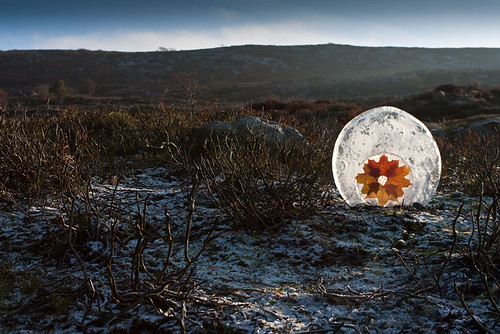
Maple Ice Leaf Disc
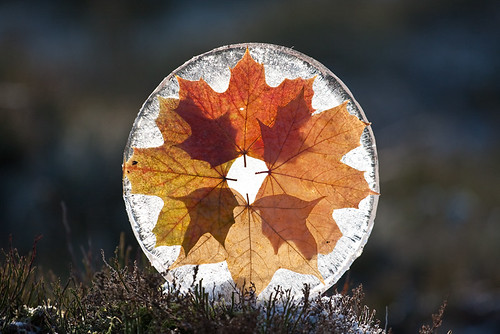
The temperatures plunged even further last night, it reached -4 C at home and -5 low on the fells, which is reasonably uncommon for this area.
For Mother Nature to provide me with some different materials to play with left me really inspired and ice, snow and frost are the very definition of ephemeral. So my two favourites things - interesting natural materials and ephemeral sculpture - sent me to bed with the hope that the sun would shine as ice comes alive when hit by low winter sun.
JRTPickle and I had been discussing new ideas and she has come up with some crackers recently (not Christmas ones) so thanks to her for the new ideas and the inspiration.
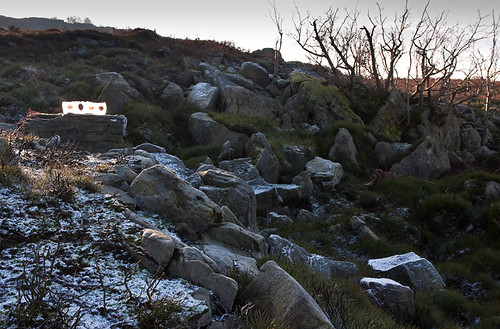
I prepared these sculptures yesterday so that they would freeze and be ready for the morning. I dashed up to the moors early as low night time temperatures are often followed by melt-warm daytime conditions. I would need to be quick to catch the dawn sun, grab a picture or two before things melted.
This turned out not to be the case. Temperatures stayed low and were low enough to stick ice to ice which broadened the possibilities. When I have tried before it has been too warm to do this.
So I constructed each sculpture using spit to weld them together and positioned them to wait for the sun to peep over the ridge. I knew that cloud was expected by lunchtime and poor weather by the evening so I crossed my fingers the sun would appear.
High level clouded blocked the sun and I waited and waited. She came out for a few seconds and I managed a couple of shots but then the cloud spread even more and the sun was gone again. Instead I concentrated on no-sun pictures as my hopes faded that I wouldn't be in luck to get the ice-shine pictures I craved.
I waited and waited some more and was tempted to pack up and go home. I feared the cloud was already here and set in and I would just be wasting my time.
I was wrong, the sun finally burnt through and I hurried to take pictures before she went in again. And that she did but not before I got what I wanted.
Heavy snow is predicted for this evening and tomorrow. I wonder if there will be lots and will it stay long enough for me to play with? Only Mother Nature can decide.
Friday, December 18, 2009
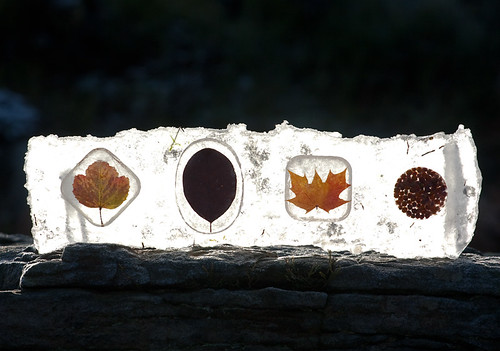
Ice Diamond Stack
Last night I sat excitedly on the couch with my eyes glued to the thermometer and the outside temperature. It was the first time that it had registered a negative value since last Winter.
First thing this morning I headed to the place where I built the Snow Ice Cairn in the hope that there would be some ice. It was very cold but there wasn't any usable ice there.
Instead I went to the little pool where I made these and the ice there was good. I chopped out some sections and searched for a place to stack them.
The slabs of ice weren't perfectly flat and slid about a bit and I needed to handle them with gloves off for dexterity. The first attempt fell over pretty quickly as you can see in this timelapse sequence and it also took on a major lean which I didn't notice until I reviewed the pictures.
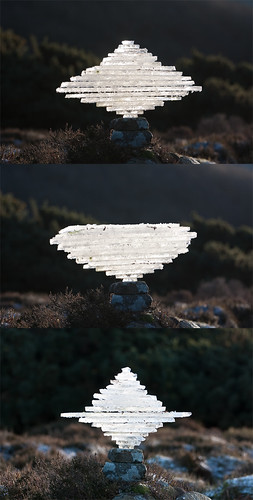
I wanted to build it really wide in the middle as you can see from the other attempts below but each time it toppled the longer ones broke so I couldn't make it as wide as I wanted.
The temperature hovered around freezing and so any liquid on their surfaces from the heat of my hands meant that the smallest pieces would slide which made it all the more difficult as the smallest was at the bottom. But I persevered and this was the result.
I left it there in the hope that it would freeze together but when I went to check this evening it had toppled. But I was surprised to find the 3 Sun Wheels still there from last week with only two leaf sections missing.
Oh and I've updated the LandArtForKids.com site with some new 'How to's'.
LandArtforKids.com
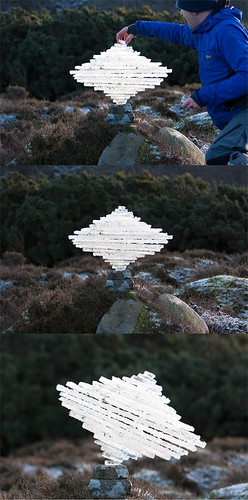
Diamond Ice Stack Attempt 1 Timelapse, originally uploaded by ...escher....
I had trouble shoring this one up but it wasn't until I saw the pictures on my PC that I saw how much it started tilting as I was trying to finish it off.
Sunday, December 13, 2009
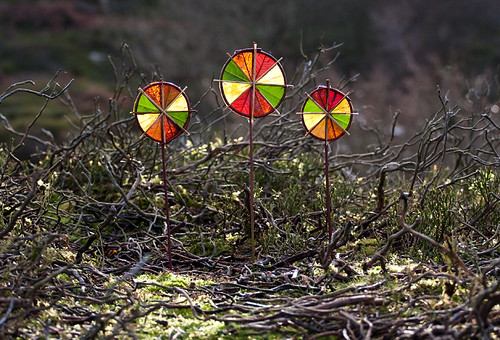
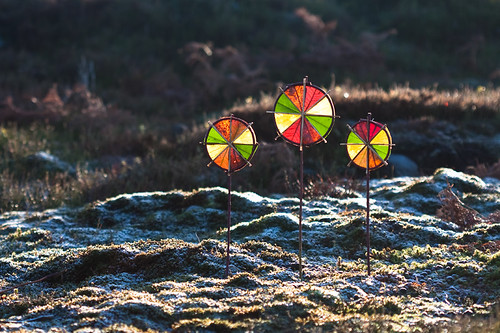
2nd Night Frosted 4 Colour Sun Wheels
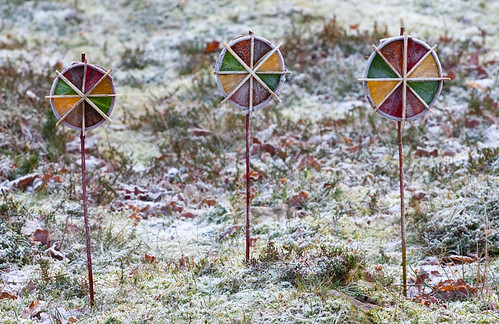
After the rapid melting of the frost on the sun wheels yesterday I left them overnight again in a frost pocket hoping that the night would be cold.
When we returned they were indeed frosty again so I set up my camera to film a timelapse of the frost melting. In the space of an hour the warmer-than-the-ground air had melted all the frost completely.
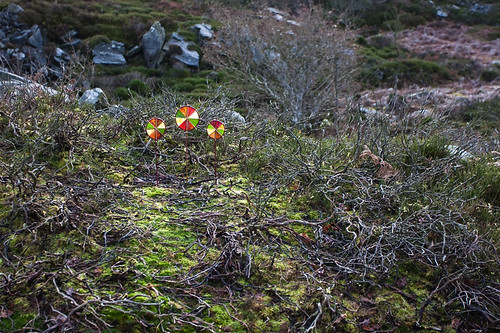
On the way back I took them with me and placed them next to the path in the hope that they would brighten someone's afternoon.
The rest of the time we made kid's land art so we can update the LandArtforKids.com site and blog in the next couple of days with new activities and games for Winter.
Frost Melting Timelapse
Frost Melting Timelapse, originally uploaded by ...escher....
This is a timelapse film of the frost melting from the Frosted 4 Colour Sun Wheels after two nights of leaving them out in the cold.
After filming the melting frost timelapse I moved them to a spot by the path at Birk Bank, Clougha and arranged them so they would catch the afternoon sun. I hope that passing walkers may chance upon them.
Saturday, December 12, 2009
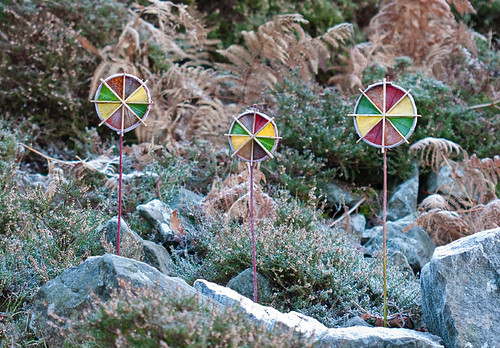
Frosty 4 Colour Sun Wheels
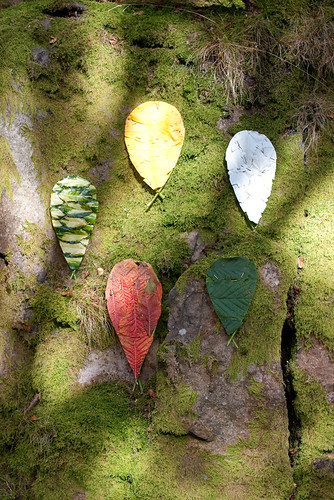
No not a super-sweet kiddies breakfast cereal but a reprise of the 4 Colour Sun Wheel I made in Spring earlier this year.
As a follow up to the 'leaves and light' series that I was following then, which was all about finding out whether Autumn colours were present in Spring and Summer, I am now starting a colours of Winter theme. I realise that Winter doesn't officially start until 21st of December and there are still deciduous leaves hanging onto some trees but the short days and frosty mornings, blue skies and golden light equal the best of Winter for me regardless of the calendar date.
But despite it being the tail end of Autumn these leaves are not Autumn leaves. Each was taken from evergreen shrubs, the same as I did in Spring. So it is clear to me now that it is possible to make these wheels at any time of the year.
I spent yesterday making the wheels but by the time I had finished the light had already turned golden and faded shortly after and I missed the opportunity to get a photograph.
So instead, after dark we headed onto the moors and looked for a sheltered spot to arrange them so they would hopefully become frosted over during the night. I was also hoping that the next day I could sit and watch the frost gradually melt off them as the sun rose and struck their frames.
But before that we would have to make it back to the car in the dark. There was just enough light to see, but for some reason the path back (despite being the same path but in reverse) was much trickier to negotiate than on the way out. Someone had placed odd shaped rocks all along the way, that tripped us and weren't there on the way out and I can tell you it isn't much fun walking into a gorse bush in the dark, although I obviously needed convicing of that fact as I repeated the experience several times.
My first thought as I woke up this morning was what the temperature was and how frosty the wheels will look. It was 1 c and so I raced out the door as quickly as I could.
When I found them they weren't as frosted up as I hoped but then the frost wasn't as heavy anywhere as it was yesterday. I took some shots of them where they were then headed off to find a spot where the dawn light would strike them. Despite the ground being hard and frosted, the air was not as cold. Within minutes of setting off walking the frost began to melt from the wheels and it was all gone after a few short minutes. So I set them up on a patch of frost and waited for the sun to appear.
Once I was done I looked for a really cold frost pocket and once more placed them out ready for tonights frost. The UV of the sun had faded the yellow and as ever the sculpture's appearance changed with time, just as everything does, the only key factor is how quickly or slowly things change, but as sure as sure everything changes whether we are aware of it or not.
The time I spent out this morning tuned me in to the temperature of the ground and the different temperature of the air. The low arc that the sun follows and the places where the sun hits at different times and the other places where the sun doesn't hit again until Spring. Although I made the sculptures yesterday and just photographed them today they still gave me the opportunity to experience the changes and cycles of a crisp winters day, the fluctuations and eddies and transitions that one might miss if you did not spend the time to study so closely.
Wednesday, December 09, 2009
Blurb reduces prices for Christmas
Blurb have just sent me an email that says:-
"...you have books in the Blurb Bookstore that might make great holiday gifts. Get the word out to your network — we'll even give them $10/£6/€8/AUD $12 off any books you've made with a value of $29.95/£16.95/€24.95/AUD $39.95 or more..."
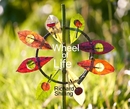
So you can get 'Land Art' or 'Wheel of Life' softcover or hardcover for cheaper than you could before, so if you're still looking for that elusive but special ;-) Christmas present then look no further! ;-)
Orders from the US (using US $): GREATGIFT
Orders from UK (using UK £): GREATGIFT2
Orders from EU (using EU €): GREATGIFT3
Orders from AU (using AUD $): GREATGIFT4"
Friday, December 04, 2009
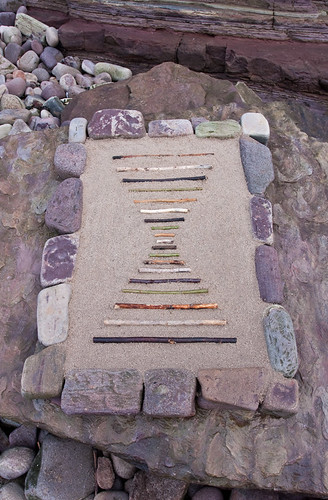
Framed Wave
I should sub title this one "Hunt for Orange Stick." It's not quite as exciting as "Hunt for Red October" and doesn't involve submarines but I wouldn't be surprised if someone made a Hollywood movie out of it.
I've not done any beach art for a while and when I woke up this morning I immediately thought "head to the coast."
The tide was due in at 12.15 and darkness and bad weather due later at 4.00pm so time was going to be short.
We arrived at 11.50, according to the clock in the car, so I expected the tide to be going out just as we got set up.
I fancied doing a sculpture similar to this but with the tide up I didn't have access to the sand. I collected rocks and started assembling them on a flat slab while I waited for the tide to recede.
But the thing was it didn't, it carried on getting higher and higher.
A 10 watt bulb lit up in my head - I still hadn't reset the clock in the car since the end of British summertime and there would be another hour before the tide would head back!
So I thought I would have to change tack and build it on the slab instead of in the sand and hope that the tide would reveal the sand in time to fill the centre and leave enough light for a photo.
But it is often the case that what you expect to be easy turns out to be the hard bit, the frame came together reasonably quickly so I set off to comb the beach for suitable driftwood to make the framed tree. I looked and looked and looked and not a single piece of wood was shapely enough and I was reminded of how I built the original and how it was all based around the stick I found to go into the centre.
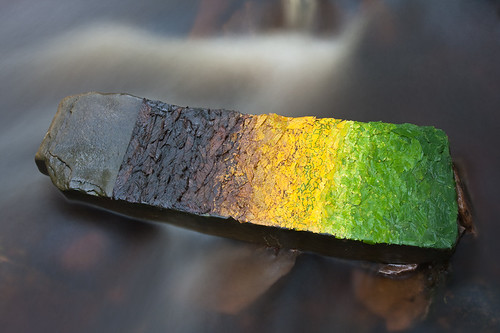
After spending a long time looking I had noticed how the driftwood was lots of different colours. Black, brown, white, green and orange - so I changed tack and thought I would show off the different colours I had found.
I started from the bottom and worked my way up and everything seemed to be going well until I got to the very last stick needed to finish it. It needed to be quite long and orange and so the "Hunt for the Orange Stick" begun.
I swear to god there was only one vaguely orange stick that was long enough and it took me hours to find it and whats more it was bent!
I gently tried to straighten it out and the obvious thing happened, it snapped! Curses!
I looked again but there were no more damn orange sticks on that beach! I don't even like bloody orange anyway!
Unhappily I placed the snapped stick at the top and knew that it would have to do and I had learnt more about orange sticks than I ever wanted to know.
Land art lessons learnt today? Don't use orange sticks.
Saturday, November 28, 2009
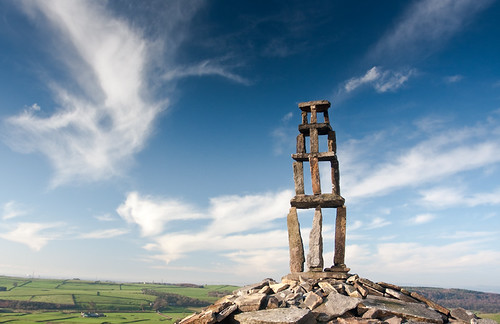
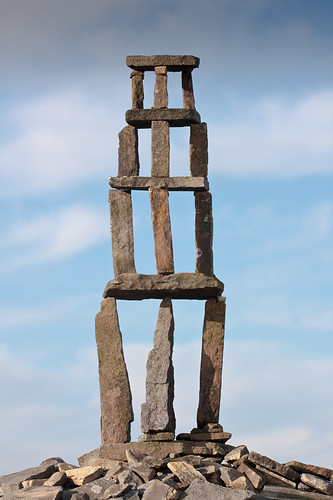
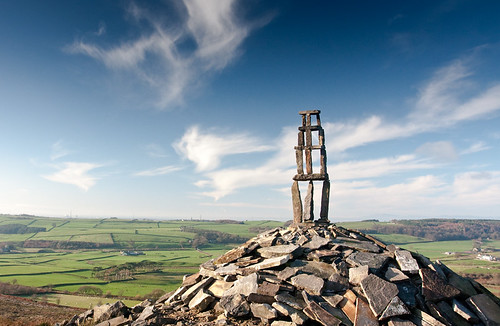
Temple Stack
I think my stories are getting a bit dull so in the fine tradition of crappy, boring business meetings everywhere I will present you with a bulleted list:-
- Indeed there was snow on the hills today, the day was windless, crisp, blue, the views wonderful and it was perfect for rock balancing
- This looks considerably more stable than it was. It took an age to find good enough rocks but still they needed some careful maneouvring to balance
- None of them were exactly the same height so lots of jiggery-pokery was needed
- I was amazed it stood up after a near collapse half way through
- I was tempted to put another layer on but it was too tall to reach
- This was made for the Land Art Connections project, November theme "stepping stones" - steps into the sky
- Have a look at the collapse time lapse clip, I couldn't leave it standing so I chucked a rock at it to topple it over
Time Lapse Collapse
Temple Stack Collapse TimeLapse, originally uploaded by ...escher....
Having witnessed my sculptures being prodded and poked by the unwary before I didn't want to leave this one standing. After several badly aimed thrown stones, one hit and this was the result.
Friday, November 27, 2009
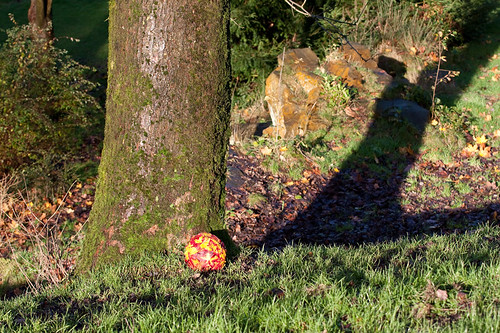
Sweet Gum Leaf Ball

What with launching the LandArtforKids.com project (did I mention that? I'm not sure if I did, I have forgotten too! Well worth taking a look at and spending a minute of your time blogging about it if you can ;-) and the not very inspiring wet weather recently, it feels like an age since I got out and made something.
To be honest not thinking too much about doing land art and not planning to do any has been a bit of a relief as sometimes I almost feel like I have to do it but a break is most certainly a double-edged sword. Although having said that it has only been two weeks since I made something but it feels like a lifetime!
That sword edge relates to the feeling that I won't have any new ideas and it will all come to an end. When you love doing something so much but aren't at all sure where the ideas actually come from then each time a sculpture is finished it is like pressing the reset button. I gather that this is a common thing amongst artists and perhaps that is the reason why they continue to make things, as an effort to prove to oneself that they still can.
My ideas come from experiencing nature and from the things that I find. So it really should be no surprise that when not trying that I have no ideas as I am not outside looking at a leaf or feeling the breeze against my face as I walk up a hill.
But sure enough when I am Mother nature fills my head with ideas, she is all the inspiration that I ever need.
As we approach Winter, each day is a little shorter, a little colder and the trees and plants have nearly given up all their colours. Here and there there are still yellow maple leaves desperately hanging onto their life giving branches but soon they will not be able to cling on anymore.
This year I have taken more notice of Autumn than I have before, it seemed to start earlier than I expected and the colours have lasted longer too. There are two Sweet Gum trees in the park nearby and they are still flushed with a rainbow of colours. This was quite apt as this morning the heavy sleet showers were broken apart by clear sections of blue sky which meant that the sky was without it's own rainbow for only a few minutes at a time.
The low light cut through the trees and illuminated the last of the leaves before another heavy shower arrived and turned everything damp and grey. I collected some of the beautiful leaves and sat down to construct something.
I like to follow the structures of the materials so that I see how they are made and so I don't force them into something they are not. These leaves were not flat so as I stitched them together the structure was not flat either but curved, so I trained them into a sphere. When I've made leaf balls before it is for that reason that it is a ball that I have made, because the curve of the leaves dictates the shape and to try and force the leaves into anything else would leave them twisted and bent out of shape.
Once I had finished the air felt noticeably colder and the sun was still low but now unchallenged by mist and cloud. It felt like Winter, breath visible, the sky crisp and blue and the light golden and lovely.
There is talk of the first snow on the hills tomorrow and the possibility of a frost. Though I will long for the days of Spring after months of long Winter nights. A crisp, frosty day in mid-Winter cannot be beaten.
Saturday, November 21, 2009

I've been working on something for several months and I am finally ready to tell the world about it.
To save any of you, who would rather not have to read the rest of the spiel below, I'll put a short version first:
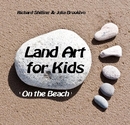
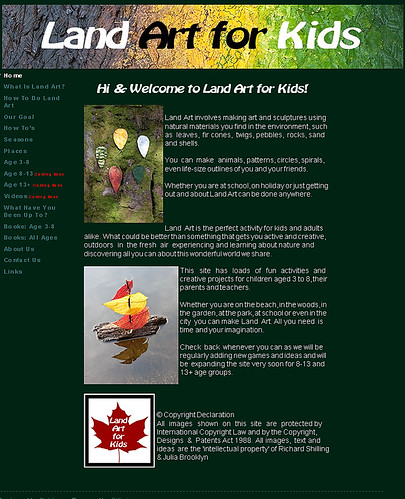
LandArtforKids.com is a not-for-profit project I have started with JRT Pickle to encourage everyone we can to do Land Art and we are starting with kids aged 3-8. So if you are in any way inclined to agree with the sentiments that Land Art encourages creativity, exercise in the fresh air, appreciation and love for nature, fun, outdoor activity and learning for kids of all ages (myself included) then PLEASE, PLEASE, PLEASE write a blog entry about it, tell all your friends, inform your schools, shout about it on Facebook, email everyone you know, come look at the website and stand on street corners with a loud hailer! (errm maybe not the last one - unless you REALLY, REALLY think this is a good idea)! And even if you don't think it is that great then tell everyone you know anyway!
I will also be posting Land Art for Kids related stuff with the Land Art for Kids on Flickr account, so please make them a contact and please become a follower of this blog too.
LandArtforKids.com
Land Art for Kids Flickr account
Land Art for Kids Flickr group
LandArtforKids blog
Oh and this is my 500th blog post too!

So some more information: LandArtforKids.com takes you through the how, why, where and when of Land Art and has lots of ideas for younger children, their parents and teachers to get kids outside making Land Art, or, more importantly, learning all about and experiencing all the wonders of nature. Please take a look and let me know what you think. Although bear in mind we've done this all ourselves so we're sorry for any mistakes on there, I've tried to check everything but I've got square eyes now!
We are going to be adding new 'how to's' all the time, films and tutorials and will be expanding the site for older children, teenagers, young adults and adults. We will add articles about the philosophy of Land Art, Land Art around the world, all about nature, natural things, natural places, flora and fauna and anything else we can come up with. And the content will be pitched to each age group so the tutorials will be more advanced for older age groups and so on. I am sure you get the idea.
We have also created a group on Flickr called Land Art for Kids and I would encourage you to post your kid's Land Art there and your own too. We will certainly be adding ours and any we do in workshops into there. I want this whole project to be interactive and to hear all about the fun and frolics that you get up to. I want to see photos and hear stories! And feedback and suggestions are most welcome. If you wish to email stories and pictures then we will happily host them for here at the LandArtforKids blog.
Here is an excerpt from the site giving you an idea of why we are doing this and what we want to achieve (and thank you for listening as always), Richard:-
"Modern life, fossil fuels and industry are having more and more impact on our world and many of us are losing touch with nature, it's wonders and it's beauty as the human race's seeming need for more and more things gradually encroaches on our wild and natural places.
There is also worry for the safety of our children and many are denied much of the adventure of the outdoors, to climb trees and to learn all about nature and instead many are leading sedentary lifestyles in front of a computer game or the TV.
Land Art is becoming more and more popular around the world for both adults and children alike. With it comes opportunities to learn about nature, to appreciate it's wonders, to learn respect for it and our place within.
But there is also bag loads of exercise, fresh air, creativity and fun to be had. Each as important for ourselves and our children as a learned respect for the world that we share.
As two Land Artists we wish to provide a place to encourage this activity, to provide ideas and inspiration and somewhere where you can learn about Land Art and share what you have learnt during your own adventures.
If any of these sentiments ring true with you then please spread the word to everyone that you can. Let your school know, tell your friends, write something on your blog about us. We need your help to get the message to everyone that we can.
If you or your kids haven't ever tried Land Art then give it a go, you really won't regret it. The treasures are in the doing and not the seeing and once you've tried it you will see what we mean.
We have started this site with young children up to the age of eight, their parents and teachers in mind. We will be adding new ideas, how to's and articles all the time.
In the near future we will be adding content for older children, teenagers and adults too with more advanced tutorials, how to's and articles all about the world of Land Art.
Whoever and wherever you are let us know what you've been up to, what fun you've had and what you've created and learnt about.
All it takes is the will to get out there and enjoy yourself, however old you are, whoever you are and wherever you are.
You know it makes sense ;-)!
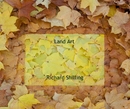
Richard Shilling & Julia Brooklyn"


Friday, November 13, 2009
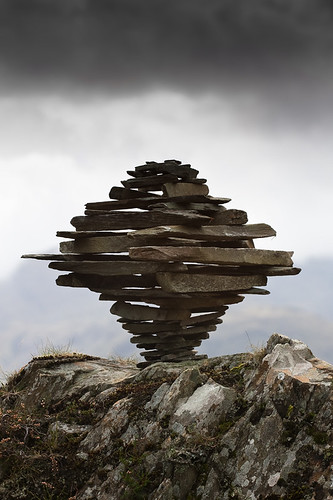
Castle Crag Tornado Cairn
I've been a bit ill this week so out of boredom I am posting something from a little while ago that didn't quite make it onto the blog.
Castle Crag in Cumbria is a small hill by Lakeland fell standards but an interesting one nonetheless. At it's top there is a disused slate quarry and there a large piles of slate just itching to be stacked on top of each other.
The outing was more for the walk and to appreciate the countryside but I still lugged my tripod and camera stuff up there just in case.
There are already a lot of rock sculptures up there although they are all the same size and style. Nothing very precarious, just pinnacles stood upright with a few smaller stones around the tallest. Their existence drew me like a moth to a flame and with slate being the primary material I thought that it would be straightforward to make shapely stacks. But it wasn't as easy as I anticipated and it was all the better for it too.
Land Art, as I regularly say, is not really about the final sculpture but the path leading up to it and what you discover on the way. A rock stack such as this one and my style of making them requires that the stones are flat and symmetrical, square edged and in matched pairs. Regardless of whether there are all the right-shaped rocks I need right by my feet (not that that ever happens) or if I have to look far and wide for them the effect I want is the same.
So I turned up at the top of Castle Crag with the attitude that the rocks would be perfect and with very little effort the stack would erect itself (or something).
Well all I can say to you is 'rombus'.
Very few of the splinters of rock were indeed flat or square-edged and the place from where I could view the stack was a short jog down from it's perch so I spend much of the time jogging to and from the sculpture, checking it's shapeliness and removing many wrong shaped stones, and the rest hunched over looking for some better ones.
Finding matched pairs was the problem. And with one of the layers I just couldn't find a matched pair no matter how much I looked.
So once again I learnt many Land Art lessons. I learnt all about the shape of this variety of slate and how many of each you could find in that place. Through having to search for just the right stones I sifted through a great number and immersed my senses into studying those that I found.
That is the point of Land Art, to discover all about what is there, what is possible to make with what you find and to peel back the layers of what the fleeting eye might miss.
As I finished up taking pictures a group of walkers came up the path and proceeded to noisily stomp past us. Regaled in day-glo head-bands, double walking poles and not much sense of how loud they were speaking, our silent idyll was broken.
"Wow, what's with all the rock sculptures here?" One said to another in the group. They hadn't noticed mine but were taken aback by the dozens already there.
"No-one knows how they got here" another replied, "it's a mystery as to what they mean."
"But why are they here?" she responded.
"No-one knows" came the second reply "maybe druids in ancient times placed them here as some sort of symbol of worship?"
The to and fro of question and answer went on for quite a bit and I tried to hide my smirk. It's funny how we always tag on a mystical and complex explanation to something we do not understand when a much simpler explanation would do. I know very well that people make stuff just for the hell of it.
A friend asked me recently why I made Land Art sculptures and his question was insightful and amusing: "do you make your Land Art to express some deep and meaningful connection with the earth? Or are you just having a laugh like the people who made Stonehenge?"
In my opinion the people who made Stonehenge got it just right. What's the point of deep and meaningful if you aren't having any fun?
Sunday, November 08, 2009
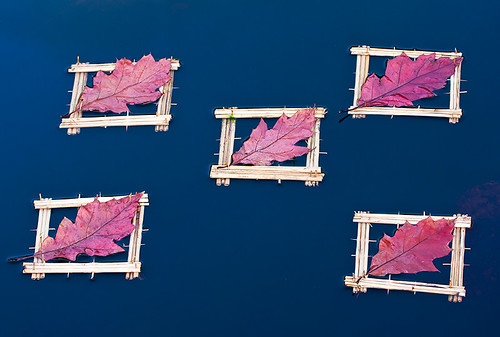
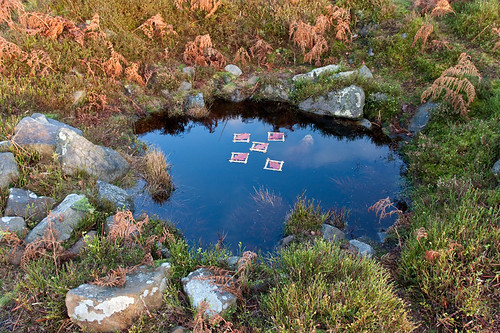
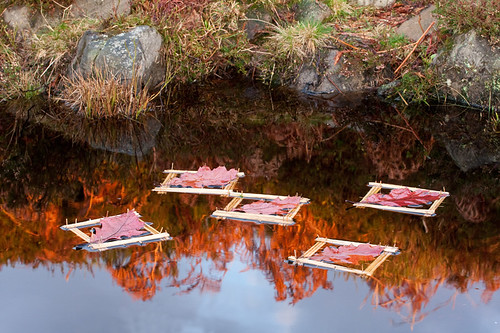
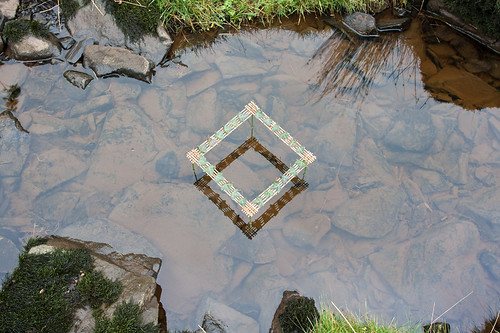
Floating Red Oak Leaf Squares
I expected to do some land art yesterday but once I got up I just couldn't muster the enthusiam. Something in me was saying that I 'should' go out do some but then I thought that was a good reason not to. If I am not filled with enthusiasm and want to go out and make something then I suspect the end result would be lack-lustre and the process frustrating. But still for some reason if I waste a day I feel guilty. But it did rain a lot yesterday so as always it's a paradox. If I had gone out I would have thought I should have stayed indoors and vice versa.
And so it was like that today and although the weather had improved my resolve and enthusiasm had not. There is nothing wrong with taking a break, I keep telling myself (sometimes I need to), and so I decided to not do any art this weekend.
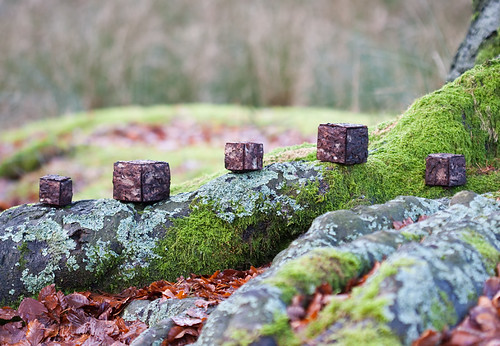
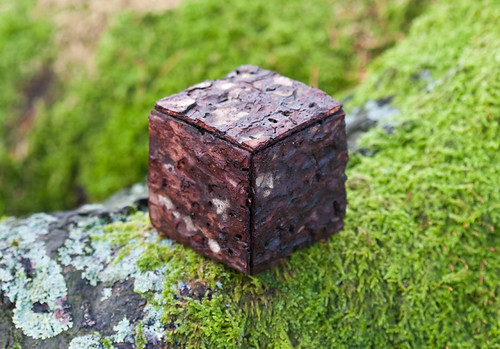
Earlier on we went for a stroll then visited the car boot sale up the road but soon returned home to the warm. I had gathered some tall grasses yesterday and so I just sat in front of the TV just doodling with some thorns not really thinking I would make anything at all. But as one minute lead to the next a construction started to take shape and finally I ended up with a cube. The leathery red oak leaves I had found the week before (our house is full up with plastic bags full of leaves in varying states of decay) were beginning to lost their colour and I was unhappy I hadn't used them for anything yet. So I pinned a leaf to each face of the cube and thought that I liked what I saw.
In the backt of my mind I was thinking about the deep dark pool I had found on the moors recently and the fact I hadn't used it for anything yet. As the construction of the cube was similar to the shadow cube I made a few weeks ago I imagined suspending it above the dark water and seeing the shadow that this one made.
There hadn't been a speck of rain all day and we arrived at the moorland parking spot to it just deciding to start. It was light but I wasn't sure when it would cease.
We trudged up to the pool and I set about rigging something to place the cube on. It didn't look right at all so I poked with a stick to teach it lesson. The top face of the cube fell off and started to float around on the surface. That looked much better so I set about dismantling the cube and took each square and set them off on a sailing adventure across the pool.
The breeze was light and it was interesting how the subtle changes in strength were almost imperceptible whilst stood there, but you could see the little rafts all start to spin and move over the surface in unison.
This all looked good in real life but their movement wasn't helpful for a photograph and my video camera had decided it wanted a new battery. I warmed the battery up and it allowed a few seconds to be recorded.
By the way, these are bigger than they might appear as these oak leaves are quite large. Perhaps from a scarlet or pin oak, I cannot tell, as the leaves are a similar size.
It didn't rain for long and soon the raindrops stopped disturbing the surface of the pool. We had arrived at just the right time and we were treated to the start of the 'golden hour.' Although it is hard to be inspired by cold, dull grey days, Autumn and Winter also produces great light. With the low sun casting golden light across the gritstone and the died-back bracken, the senses are treated to a wonderland of glowing landscapes. Opportunities might be short lived but they are so worth seeking out at this time of year.
Sunday, November 01, 2009
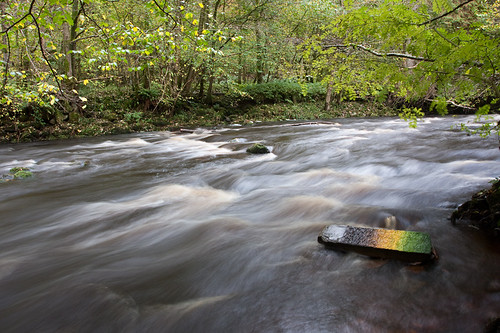
Roeburn River Sculptures
Roeburn River Sculptures (Part 1), originally uploaded by ...escher....
Here is a little footage of the Wych Elm Circle, Equilibrium Stack and the Autumn Beech Water Box all made at a particularly beautiful spot on the River Roeburn. I am showing you this by way of contrast to Part 2 of this film taken when we visited the River today. The change from gentle and idyllic to raging torrent takes the breath away, it's thrilling how one night of rain on saturated ground can change a river's character so fundamentally.
Part 2 is below.
Oh and for Halloween fans. Look out for the Blair Witch remake - answers on a postcard for the chance to win a prize.
The weather is just a little too wet and wild today to really chance on trying to make something so instead we went down to Roeburndale to see what state the plentiful rain had left the river in and to see what Land Art Mother Nature could conjure up without our intervention.
We went past the River Lune at Caton on the way and it was high. I've seen it higher a year ago and then, by the two bridges, it was absolutely raging and I took some epic film footage. I spent quite a few hours trying to track down those clips on Friday but I think I might have deleted them. I was hoping that the Roeburn in spate would make up for it.
I wasn't disappointed.
Spider Earthquake was the least of their worries, instead it was biblical flood.
The place where we had made sculptures both sides of the river was now a raging torrent and the Equilibrium Stack was long gone. We could hear not only the power through the sound of the rushing water but could hear the thunks of rolling boulders too.
With the majesty of the river and the strong winds bringing down a procession of beautiful leaves that carpeted the ground like a rainbow of sweetie wrappers, it was hard to ever imagine how one could beat or even match the power and beauty of nature. My humble dabbles are just that in the face of such things.
I wonder if the kayakers we saw upstream of that section were brave enough to shoot through that place.
On the way home as we returned past the Lune again she had burst her banks and now filled the flood plain. The first of November has certainly brought changes just like the first of October did.
It's from about 45 seconds where you can see the place where Part 1 was filmed.
Roeburn In Spate (Part 2), originally uploaded by ...escher....
Saturday, October 31, 2009
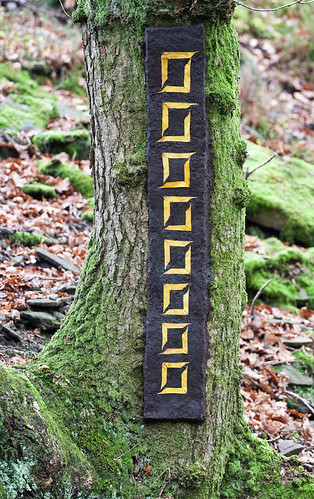
Maple Vein Calligraphy
This might take some effort to write. More, I think, than the sculpture. I seem to have developed a woolly-head and feel that my time may be better spent having a snooze. If the story turns into gibberish later on then I expect it is because I am resting my head on the keyboard but I wonder if anyone will be able to tell the difference from one of my regular stories?
After making the Leaf Lightning sculpture I wanted to employ that technique again. The black mud I found at that spot is such a wonderful material to work with and with day being unseasonably warm there was no other choice than to find a place for a canvas and follow my train of thought to it's destination.
As has happened before at this place a Peregrine Falcon sat on a rocky perch (not a fish) and looked over me as I got to work. I wasn't sure whether the mud would stick on something vertical but it gave me little trouble. I had collected some yellow sycamore leaves and my first thought was to do something similar to the leaf lightning design. I liked the style and how the colour seemed to flow almost like electricity from within and I thought a yellow fork aiming towards the roots would bring to mind something about energy (or summink) but as I prepared the leaves I selected only those with right angled veins and these lent themselves better to a different design. With the way each leaf ended in a point it reminded me of a calligraphy script or an old style printing typeface.
Now I was suprised that I was paying enough attention to notice this as most of my awareness was directed towards a common affliction at this time of year - having a soggy a**e. Each of the several times I washed my hands in the stream I wiped them dry on the back of my trousers and now the moisture had seeped through enough to bring on some unpleasantness. I thought you would probably want to know ALL the details.
Anyway...So as I said I followed the right angles in the leaves and created L-shaped sections. They stuck very easily to the mud, a bit like fuzzy felts, so I began doodling some ideas. At once the shape I ended up with seemed right and quickly the whole idea formulated in my head (my bum had dried out by this point) and with the visualisation I believed that everything would now be straightforward. But is it ever?!
I had collected quite a lot of leaves but only very few of them had right-angled veins. Added to that they varied in size quite a lot which meant that I wasn't going to be able to make them all symmetrical.
So I started to place them from the bottom to the top and as I approached the upper section the spacing was all wrong so I shifted them all up a bit. And down about, and up a bit again, and then down a bit and then up a bit some more and then down and then up. This went on for quite a while.
The tree was next to a tumbling stream with a large wall on one side so to get a proper look at it I had to cross over it, climb over the wall and then up a bank for a squint. I am finnicky to the point of driving oneself mental, which is ok if you are next to the sculpture and can tweak it close by. But now I had to tweak it, cross the stream, climb the wall to view it, then reverse the maneouvre to re-tweak (that's a technical term). Eventually I had worn a deep groove where I had walked and created a whole new stream. Geological erosion in action - I guess that might be land art too..
Eventually though, after several days had passed I was happy with it, I washed each leaf with some stream water to remove the mud and crossed back over the stream and wall to take some photos.
Ah, but I had left my camera remote in my bag next to the tree so I had to go back again to get it.
After another return journey I peered through the viewfinder only to see my rucksack and camera bag in the frame. Yes you guessed it I wasn't quite finished with the clambering. After moving my bags out of the way I returned to the camera and took the shots I needed.
"Right now for some close-ups. Where is my telephoto?"
I expect you can guess the answer to this question.
A bell went off in my head and I thought "hey maybe this time I'll go and get ALL my stuff and bring it over here, that would be a good idea wouldn't it?!"
Now I could portray this in a manly and dedicated way and say "I don't like to do anything the easy way - no-one ever achieved anything in life taking the easy road" but really it can be summed up with the word dumb-ass.
Having done enough exercise to last me a good while I packed up my gear only to find a ladybird had taken a liking to my rucksack and was clinging on tightly to a strap. Thinking that she would rather stay here in the woods I tried to gently pick her off. She then pulled really hard into the strap with her hooked legs, and emitted a yellow substance onto my finger.
I've never seen that before and I assume it would be a bitter tasting defence mechanism.
Of all the things I see, experience, learn about and enjoy whilst out and about I never, ever tire of those little things that are there for us all to find out about if only we would take the time to look. How interesting it is to be alive and what a wonderful world we all share. There is nothing better in life than being outside in nature, well, just being.
Ps. This was made for the Land Art Connections Project on 31/10/09 for the October theme "Haloween". Haloween has never meant much to me as a festival and I don't think this sculpture has much to do with it. But it was made on the day so is connected all the same, and will be to the other sculptures made on this day and, for me, that is what it is all about.
Land Art Site
Land Art Blog
Friday, October 30, 2009
Snow Meander Film
Snow Meander Film, originally uploaded by ...escher....
It's been very cold here and has been snowing heavily. Just kidding! This is footage from back in February and I have been dreaming of more of the same this winter.
By the way, thanks to Rick for bringing it to my attention that you can see the article about me in Lancashire Life here should any of you be interested. It starts on page 24.
Some foul weather is on it's way this weekend so I have no idea whether I'll get anything done or not but I am excited as, shortly, I will be revealing to you a secret project I have been working on since early summer. But keep it under your hat - it's for your eyes only!
Sunday, October 25, 2009
Wych Elm Leaf Colour Slab
Now this might look unfinished to you, I would have liked to have covered the whole slab but what might look like a idyllic scene does not tell the whole story.
There was quite a bit of rain yesterday and overnight and when I arrived at the river it was much higher than it has been recently. Unbelievably my Equilibrium Stack, was still standing but I couldn't get across to it to see the spider colony. And where the Autumn Beech Water Box once stood there was now considerable white water and several large bow waves. The power of the river was impressive so I went up stream to see what I could find.
On the walk down the strong winds had brought down lots of leaves and we found some particularly striking mottled yellow and green elm leaves and so I decided whatever I made would have to incorporate them. As I clambered over the moss covered roots and river stones along the bank I came across a large flat slab and immediately wanted to use it.
I spent a while man-handling it until it was a few inches above the surface as I thought it would look attractive there and so I begun a few different leaf designs to see what I fancied doing. After a while I could see the different hues present and thought about making a colour fade.
I am quite accustomed to studying leaves but the Land Art lessons I would learn today would not be what I expected and would prove to be quite infuriating! As I finally got the green section done the water had obviously risen and now a wave kept passing over the slab removing some of the leaves. I really, really hate redoing things even though I often have to. As things take shape I get excited about how it is looking and it helps push you on to do more, to go back and redo things upsets the flow and is annoying.
As the first wave hit I had just started to really get into it and could see how it would turn out but there was nothing else for it I had to shore up the slab some or else it was going to keep happening.
That was easier said than done. As I moved it I dipped the leaf end into the water and half of them floated away. Curses! It was still raining and so the water was going to keep rising but this obvious fact did not seem to filter through to the useful part of my brain and each time I started again, after making it higher, more waves would crash over the top of it taking my leaves with it.
The other problem I had was shoring it up without dropping the whole thing into the water. The slab was about three feet long and quite thick and very, very heavy. And the water was now welly height which made it even more diffult to lift up. The flow was so strong that as I dropped in stones, even big ones, into the water to put the slab on top of they would immediately be grabbed by the current and disappear into the depths. I was in a quandry. Should I risk it as it is and hope all the leaves don't get washed away? Or should I persevere and get it higher as any work would end up ruined if I didn't?
Well it took a while to finally get it and realise that I would have to make it much higher or go home with my tail between my legs. After four more times of making it higher but not enough, as the rising water sent new waves over the surface removing loads of leaves I eventually realised I would need to sort it out properly. I raised it even higher and begun, reluctantly, to fill in the ruined sections.
And yet the river was still rising. Hmmm, I am an idiot!
I thought that I would now not fill in the whole slab as I couldn't seem to get the waves to stop or get it high enough. I tried something else, I chucked some big stones in up stream from it to create a break water and that, after throwing in some really big ones, seemed to help. I went back to the little platform I had made to kneel on and carried on. It took a few seconds to notice that I had neglected to raise up my platform and now my horizontal wellies were full of water! Idiot again!
But as usual I perservered and the waves now only went over the section I didn't fill in at the end. So it might not look finished and next time I will plan things properly but once again nature herself played a part in what I created and without a crane and a SCUBA suit I could do no more!
Arty-farty alert:-
It occured to me as I was making this that the leaf colours are like the story of a tree's year. The fresh green growth of Spring at one end, continuing through Summer, fading to yellow during early Autumn, then to brown and finally to black as the leaves rot on the forest floor during Winter. It is like a timeline of the seasonal lifecycle.p>
Friday, October 23, 2009
Ivy Shadow Cube
The trials and tribulations of Land Art.
Today we went somewhere different for a change, Barbondale in the Howgills. It is an awe inspiring landscape and with the yellowing grass, russet-brown bracken and dramatic skies the hills of Northern Britain are a treat during Autumn. Despite the inspiring landscape I find being creative much more challenging in limestone country.
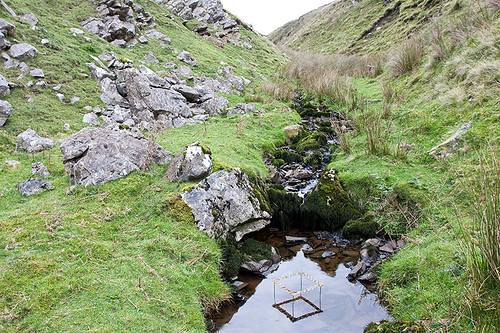
The stream we set up next to disappeared in two places no doubt into a cave system. In one place it just petered out but in another you could hear it crashing down into the earth via a subterranean waterfall even though you couldn't see it's passage downwards.
Here the leaves had all but gone and despite it being mild I felt the barrenness of winter as materials were few and far between and as is usual I wandered looking for inspiration.
On the ground thistles were growing in a intriguing star shape so I first tried making a mud frame on a limestone wall to secures some of their leaves but the mud was the same colour as dog poo and really didn't look attractive at all!
Then I tried wrapping stones with bark but that didn't work either. There was plenty of rock to do some rock balancing but that felt like a cop-out. I wanted to make something ephemeral from plant materials.
By now I had spent several hours trying different things and nothing was grabbing me or looking like it was an idea that needed to be carried through. I was ready to give up as I was cold and the dexterity in my hands was fading and I wasn't sure if I could actually come up with anything worthwhile.
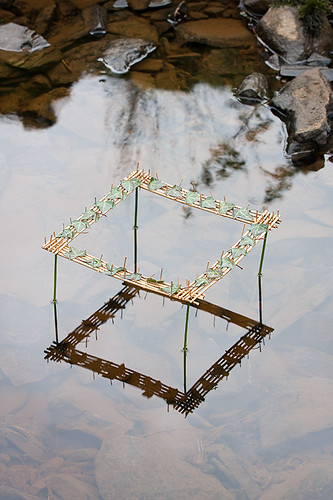
There was a raft of ivy growing over small cliff so I studied it's leaves for a bit. I had always overlooked ivy leaves before in favour of something more colourful but as they were the only leaves to be found here I sat down and looked at them more closely. Some had purple veins in them, some were pure green and some variegated. I thought to myself that they are actually very pretty leaves.
The other useful materials to be found there were grasses and thorns so I set about constructing a frame for the leaves.
Earlier I had noticed a calm section of stream and I liked how all the rocks were covered in silt and how dark the bottom was. I put the square sculpture onto the water and it floated but as I lifted it up I immediately saw the shadow. I would have to incorporate that with the idea so I did.
The most difficult part of this last bit was getting the legs to sit vertical so that the cube sides looked reasonably symmetrical. It's not perfect but the flow of the stream and the breeze made it diffuclt to get just right and the bottom was all stones so I couldn't just push the grass stalks into mud as I would have liked. Instead I had to move the stones around on the bottom until it was possible to reveal the full cube shape.